
Rising Ixa was one of the characters i wanted to make and have been thinking about it for a very looonggg time. Here's a custom a friend of mine made which i secretly loved it to bits!! ;p As you can see, he uses the "slot in" technique of slotting in the vinyl chest piece, replace his shoulder pads and head with rising ixa vinyl shoulder pads and head. And then repaint everything to reflect rising ixa's color theme. Voila! Rising Ixa!!

The problem for my own customs is as i have said, i didnt want to use too much vinyl. And the trouble with making him without vinyl is of course the intricate chest piece! So detailed so many layers and so edgy and sharp. How to make it with putty and not having them slouching when I sculpt them??
The solution was staring right in front of me all the time and I didnt know it. When I started making customs (see my Birth custom tutorial posted earlier), I used vinyl. When I was heating the vinyl chest armor of Birth up I quickly realised two things (1) vinyl are very bendable in heat and (2) vinyl's gonna crack sooner or later under the moist yet heaty weather of Singapore!!
I wanted to have my customs last until the day i retire (which is not soon, just so you know. In fact quite a long way to go T_T). So I cant have my customs cracking on me due to the temperature in the next 5 or 10 years. This means I must try to avoid using vinyls.
Coming back to the topic of making rising ixa's chest, I wanted to use putty and not vinyl to make it. But to use putty to make it, I have to have extremely skilled custom hands or a lot of tools to make them the way they should be: pronounced and smooth like metal at the same time. At my current skills and available tools, that really cant be done T_T
I went ahead and used vinyl to make rising ixa's chest first. I didnt realise then that this was the first step in making a putty chest :D
I hunted for the longest time for a vinyl rising ixa toy and if it wasnt for a friend who messaged me telling me he found a bunch of vinyl rising ixa for sales at the Takashimaya annual toy sales, I wont have found it! I bought 2 rising ixas and a ryuki series character (dont know who, he was pink color o_o).

I wanted the details of his chest to shout out, protruding and all. So I used 2 vinyl rising ixa's chest to make all details pronounced by doubling all the protruding surfaces. This is done by leaving one of hte vinyl chest intact and cutting the second one up to get all the protruding details out like the photo below. I also removed the vinyl round knob at the centre of his chest and replace it with transparent araldite to add more realism.

I then patiently glue the cut out parts right on top of the same place they were in the chst piece on the other vinyl chest piece. Repainted the araldite portion using clear red. Repainted the rest with red and silver. The result was quite satisfying:

You now have a more or less nice rising ixa's chest. Now, you may not realise it yet but there is actualy a problem sticking this piece on Ixa. You see, Ixa's original chest are actually 95% full diecast!! This mean you cant even shave off some surface from ixa's chest to stick rising ixa viny chest on it without the combined chest become too protruded to look like he is having breasts!!
So I went about hunting alternative chest piece to glue the rising ixa vinyl chest piece on it and then place on ixa's body. I found a spare Taiga chest piece, not the best of replacements but i dont have any other spare chests :/ The problem with Taiga's chest is that its smaller than Ixa's. The lower peg can be connected to ixa's body but taiga do not have upper peg. It has a couple of inner middle pegs which doesnt peg on ixa's skeleton frame.
So I did some modifications to it. I shaved off some surface of Taiga's chest to make it less protruding and then stick the vinyl rising ixa piece on it. The difference in height, I used putty to shore it up. I then drill 2 small holes on the putty to glue in 2 sticks in it. The sticks will connect to Ixa's body plugs. See photo below for hte 2 blue sticks i mentioned. Those sticks are actually from gundam model kit's remaining spare frames after you cut off all the parts you need to make the gundam. Those frames proved to be very useful as connectors or as part of the sculpts for a lot of customs :)
So I did some modifications to it. I shaved off some surface of Taiga's chest to make it less protruding and then stick the vinyl rising ixa piece on it. The difference in height, I used putty to shore it up. I then drill 2 small holes on the putty to glue in 2 sticks in it. The sticks will connect to Ixa's body plugs. See photo below for hte 2 blue sticks i mentioned. Those sticks are actually from gundam model kit's remaining spare frames after you cut off all the parts you need to make the gundam. Those frames proved to be very useful as connectors or as part of the sculpts for a lot of customs :)


So there you have it: rising ixa's chest :)

The next part you need to change is of course the head. The original ixa's head piece actually can be used to make rising ixa's. Cut off all the armor protecting his mouth and eyes and you will find a nice wide eyed ixa similar to rising ixa's. Cut details into the mouthpiece to make it more detailed. Those armor parts that you cut off earlier are useful. Reconfigure them a little and add some small amount of putties on them you will get the parts needed to make ixa's head resembles rising ixa's :D See photo below. The central piece between his eyes are actually from the vinyl rising ixa's head. The side pieces next to the central one are actually ixa's original horns relocated, cut up and glued back together. The pieces on his cheeks are actually ixa's actual cheek armor but I added putty on them to make them wider and then repainted all of them.

The next part that needs adjustment is the body itself. Rising ixa's have more lines going on compared to ixa's simple body. So I added putty lines on them. Back then my putty manipulation still sucks so the lines was kinda wierd looking,also back then i didnt know i can sand them to make them smoother T_T

I stop short of adding those horizontal lines all over his back though, that would be too much i feel. I also cut lines on his lower back torso (the ones with silver paint next to the black paint) to reflect rising ixa's red lines (which i repainted it later, see photo below).
After the above, its a matter of recoloring the entire figures into rising ixa's color scheme :)
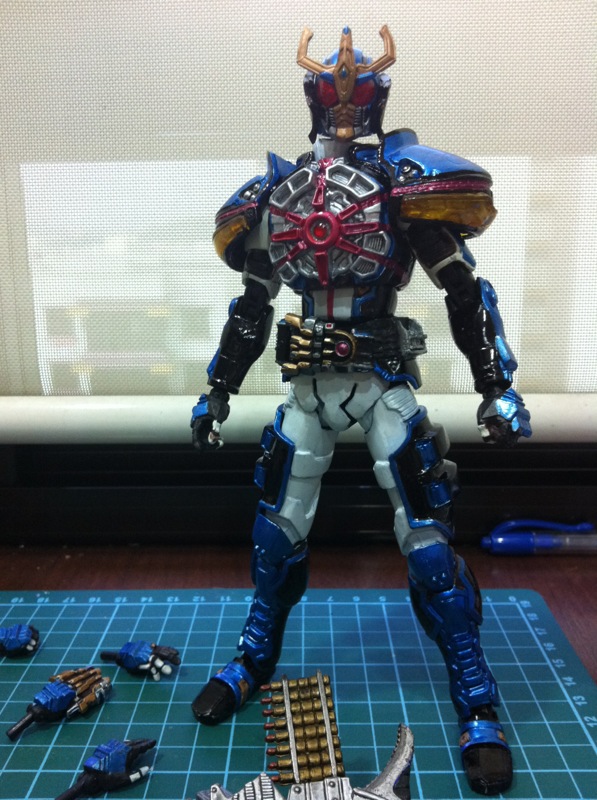


Give him a coule of weapons; his sword and a rotary cannon i took from a spawn figure, put a cape on him (no i didnt make the cape connectable, its al camera tricks bahahhaha) and there you have it: a Nice rising ixa like the one i saw some guy's drawn and colored.


A comparison of the original Ixa and the custom Rising Ixa:


The paint i used was gloss black, metallic blue, gloss red, clear red and gold paint from Mr. Color. the cape was from Dark Kiva's repainted red.
That wraps up another custom tutorial :D BUT wait! this is not the end! Wait for the next instalment when i have time to test changing that vinyl rising ixa chest into putty chest :D
As a closing lets say goodbye to Ixa ;D

As a closing lets say goodbye to Ixa ;D

No comments:
Post a Comment